How to Connect a Camera to Windows 10
Although Windows 10 can automatically configure most cameras, it does not mean they will continue operating with issues indefinitely. Sometimes, peripherals can stop working for many reasons. For instance, it could be due to a problem with the driver, recent system updates, privacy settings blocking access to the camera, or hardware-related issues.
If you notice problems with the built-in webcam on your laptop or USB camera on a desktop computer, Windows 10 includes several ways to fix the most common issues using Device Manager, Settings, or correcting the software privacy settings.
In this Windows 10 guide, we will walk you through serveral ways to troubleshoot and fix problems with a built-in or USB webcam.
- How to fix camera detection on Windows 10
- How to allow apps access to camera using Privacy settings
- How to update camera driver using Device Manager
- How to rollback camera driver using Device Manager
- How to reinstall camera driver using Device Manager
- How to fix apps camera access using antivirus*
How to fix camera detection on Windows 10
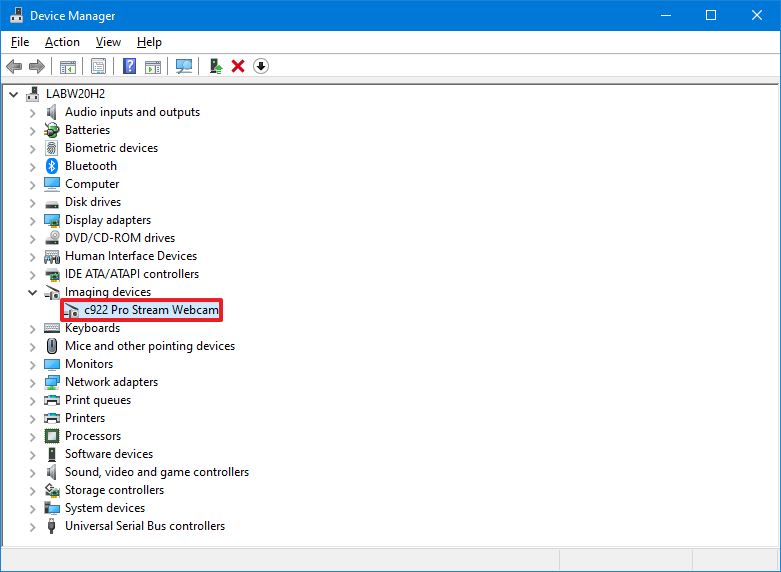
To confirm the peripheral is getting detected, connect the camera to the device (if applicable) and use these steps:
- Open Start.
- Search for Device Manager, and click the top result to open the app.
- Expand the Imaging devices, Cameras or the Sound, video, and game controllers branch.
-
Check the camera appears in the list to confirm that Windows 10 is detecting it.
 Source: Windows Central
 - (Optional) If the camera is not available, click on Actions from the top menu.
-
Click the Scan for hardware changes option.
 Source: Windows Central


Once you complete the steps, if the camera is not listed, disconnect it, restart the computer, connect the camera again, and follow the above steps one more time. If possible, you can also try a different USB port to confirm it is not a problem with the port. Or try to connect the camera directly to the device if you are using a USB hub.
If the camera is still not working, try connecting it to another device to confirm that it is not a hardware problem.
If the camera no longer works, or you are ready for an upgrade, we recommended the Logitech BRIO webcam because of its 4K resolution and HDR support, as well as for its compatibility for Windows Hello authentication on Windows 10.
How to allow apps access to camera using Privacy settings
On Windows 10, the system can automatically limit apps (such as Microsoft Teams, Zoom, Skype) access to the microphone and camera to help you protect your privacy and improve security. If the camera is working, but you cannot access it from a specific application, you revise the privacy settings.
To allow apps to access the camera on Windows 10, use these steps:
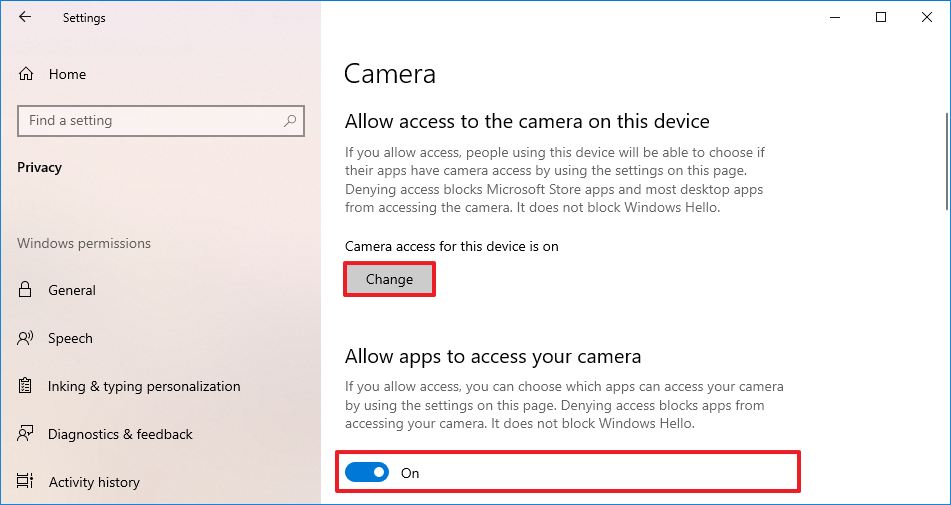
- Open Settings.
- Click on Privacy.
- Click on Camera.
- Under the "Allow access to the camera on this device" section, click the Change button.
- Turn on the Camera access for this device toggle switch.
-
Turn on the Allow apps to access your camera toggle switch.
 Source: Windows Central
 -
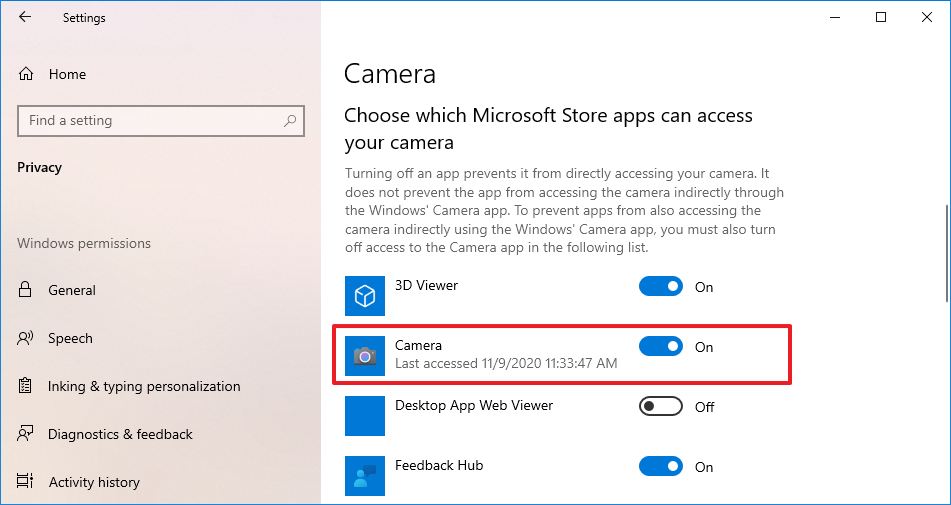
Under the "Choose which Microsoft Store apps can access your camera" section, turn on the toggle switch for the program you want to allow camera access – for instance, Camera, Skype, Microsoft Teams, etc.
 Source: Windows Central


After you complete the steps, the camera should be accessible from the apps you selected.
The above instructions are to allow camera access for Microsoft Store apps. If the problem is with a classic desktop application, turn on the Allow desktop apps to access your camera toggle switch at the bottom of the page.
How to update camera driver using Device Manager
If the camera stops working after installing a cumulative update or new version of Windows 10, there's a chance that the camera driver is causing compatibility issues.
To update the driver to fix camera problems on Windows 10, use these steps:
- Open Settings.
- Click on Update & security.
-
Click the View optional updates option.
 Source: Windows Central
 - Under the "Driver updates" section, select the newer driver update for the webcam.
-
Click the Download and install button.
 Source: Windows Central


Once you complete the steps, the driver's new update will download and install automatically, resolving the problem.
Sometimes Windows Update may not have the most up-to-date drivers available. If this is the case, you may need to check the manufacturer support website to get the newest drivers available and the instructions to apply them.
Remove quality update of Windows 10
If the problem appeared after installing a system update, you could remove the update to get the camera working quickly.
To remove a system update on Windows 10, use these steps:
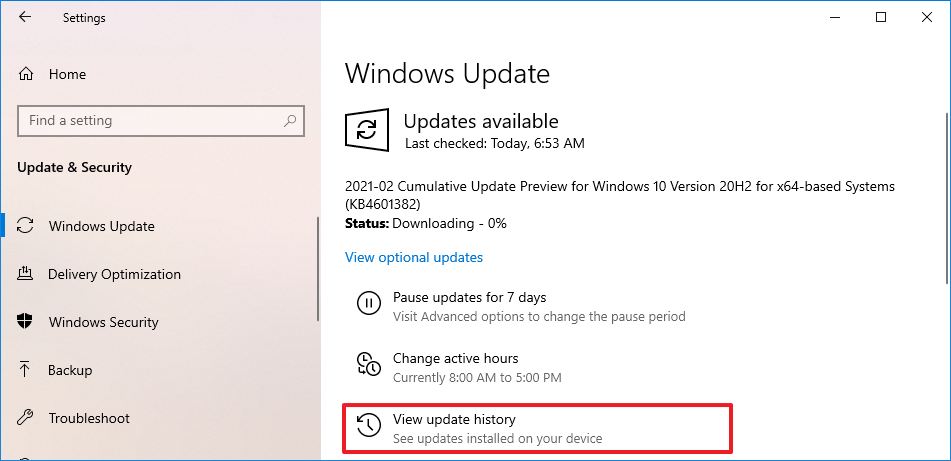
- Open Settings.
- Click on Update & Security.
- Click on Windows Update.
-
Click on View update history.
 Source: Windows Central
 -
Click the Uninstall updates option.
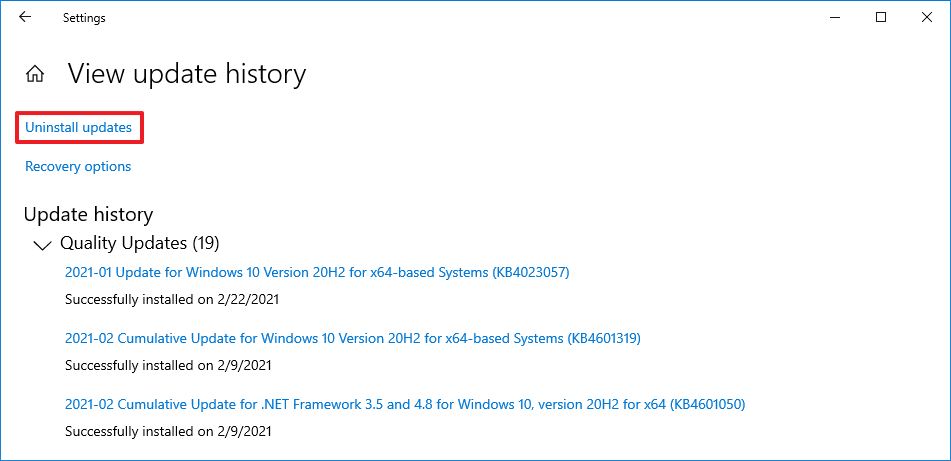 Source: Windows Central
 - Click the Installed On column header to show the updates in chronological order.
-
Select the most recent update and click the Uninstall button.
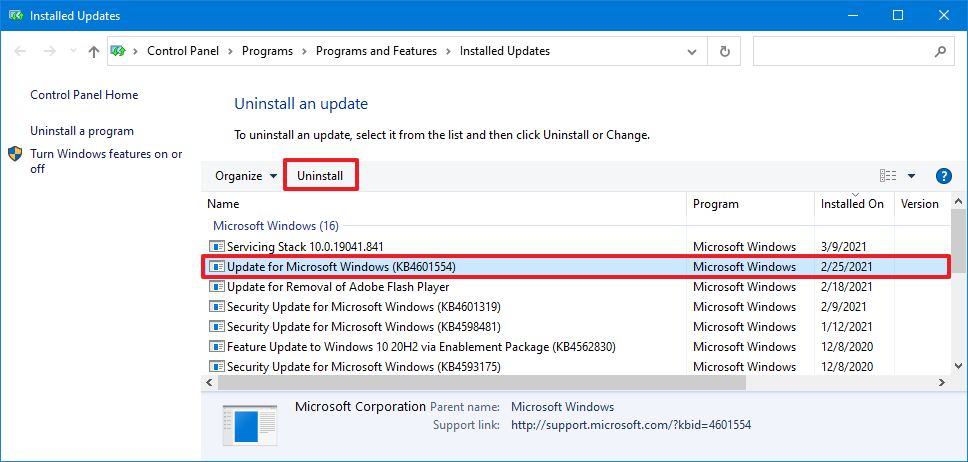 Source: Windows Central
 - Click the Yes button.


After you complete the steps, the update causing the issue will be removed from the computer, resolving the webcam issue.
Rollback previous version of Windows 10
If the camera stopped responding after installing the latest version of Windows 10, you could remove the feature update to resolve the issue, and when you know that the problem has a permanent fix, you can upgrade again.
To uninstall a version of Windows 10 to fix the camera problem, use these steps:
- Open Settings.
- Click on Update & Security.
- Click on Recovery.
-
Under the "Go back to a previous version of Windows 10" section, click the Get started button.
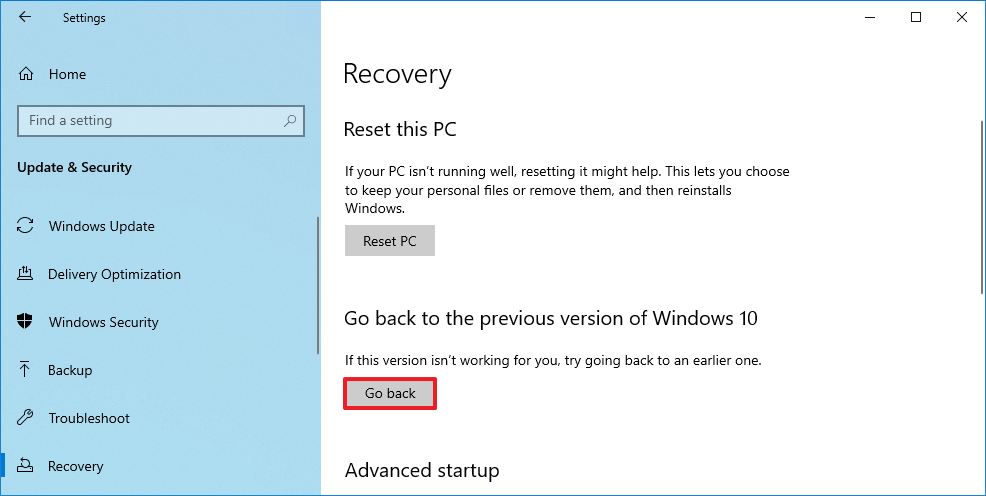 Source: Windows Central
 Quick note: If the option is not available, then you cannot roll back to the previous version.
-
Check any of the reasons from the list.
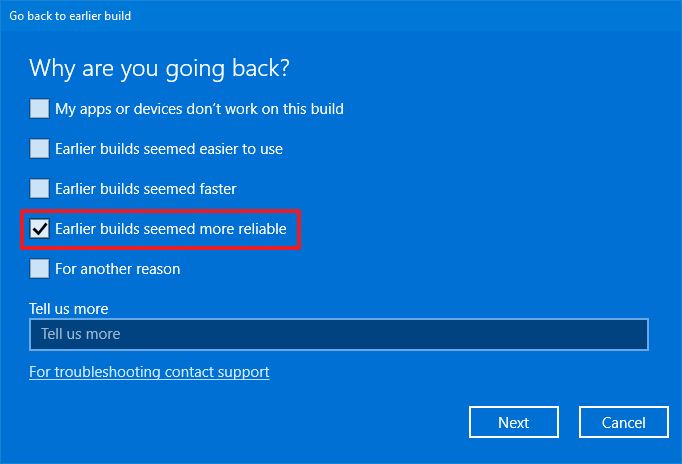 Source: Windows Central
 - Click the Next button.
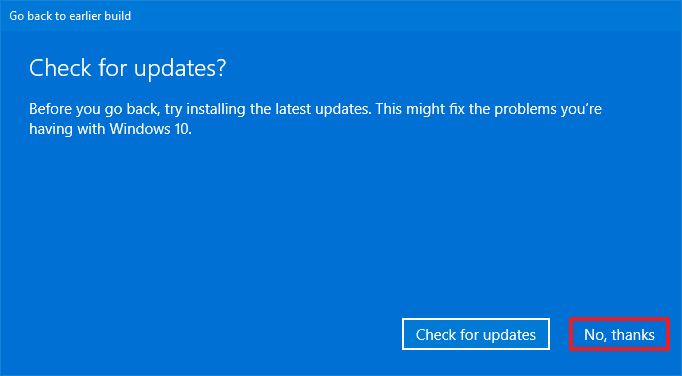
-
Click the No, thanks button.
 Source: Windows Central
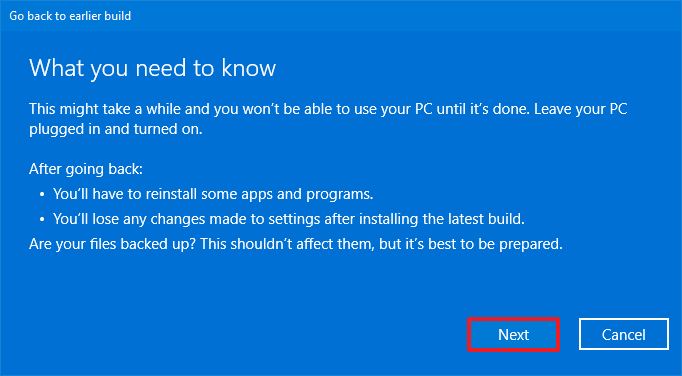
 -
Click the Next button.
 Source: Windows Central
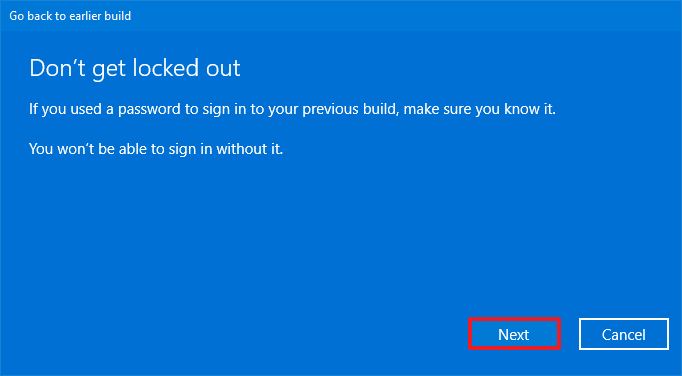
 -
Click the Next button again.
 Source: Windows Central
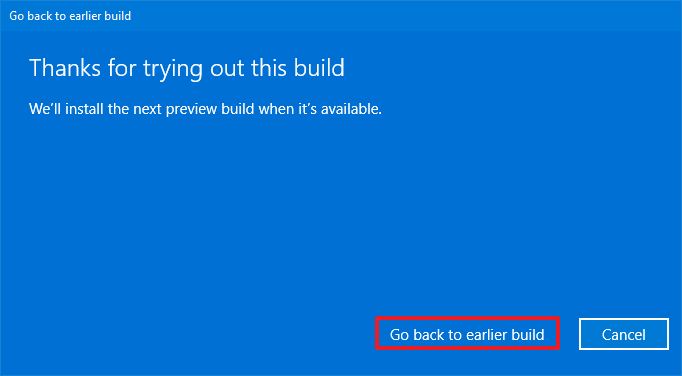
 -
Click the Go back to earlier build button.
 Source: Windows Central


Once you complete the steps, Windows 10 will roll back to the previous version when the webcam worked correctly.
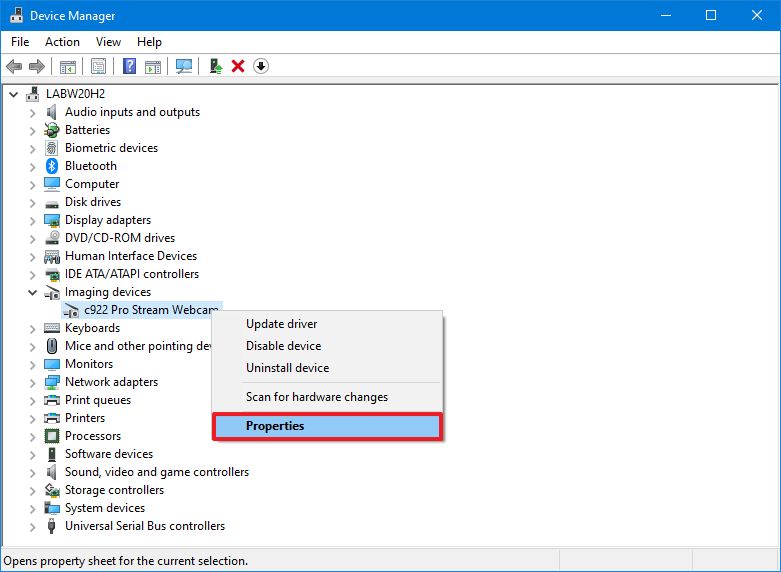
How to rollback camera driver using Device Manager
Sometimes hardware manufacturers will roll out driver updates that may still contain compatibility issues. If the camera was working before a recent driver update, restoring the previous version can resolve the problem.
To roll back the camera driver to its previous version, use these steps:
- Open Start.
- Search for Device Manager, and click the top result to open the app.
- Expand the Imaging devices, Cameras, or Sound, video, and game controllers branch.
-
Right-click the camera and select the Properties option.
 Source: Windows Central
 - Click on the Driver tab.
-
Click the Roll Back Driver button.
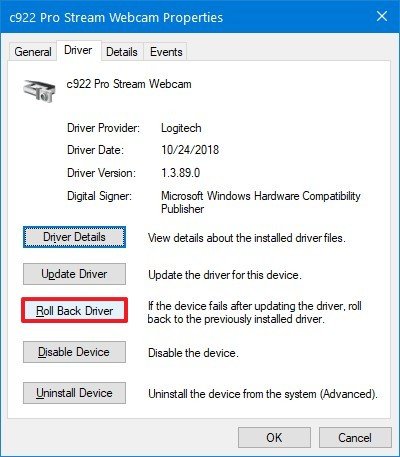 Source: Windows Central
 Quick note: If the option is not available, then you cannot roll back to the previous version of the driver.
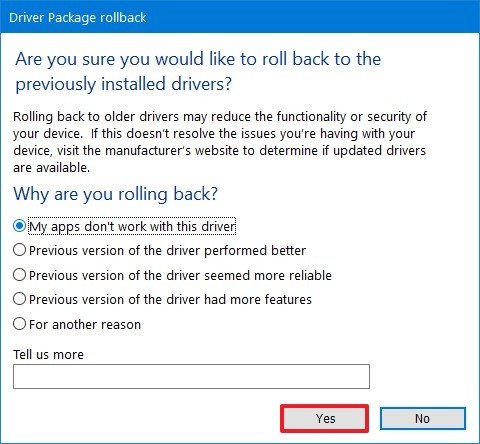
- Select one of the reasons from the list.
-
Click the Yes button.
 Source: Windows Central
 - Click the Yes button again.
- Restart your computer.


After you complete the steps, the older driver will be restored, allowing the camera to work again.
These instructions will also prevent Windows Update from downloading the same camera again. However, when a new driver becomes available, it will download and install automatically.
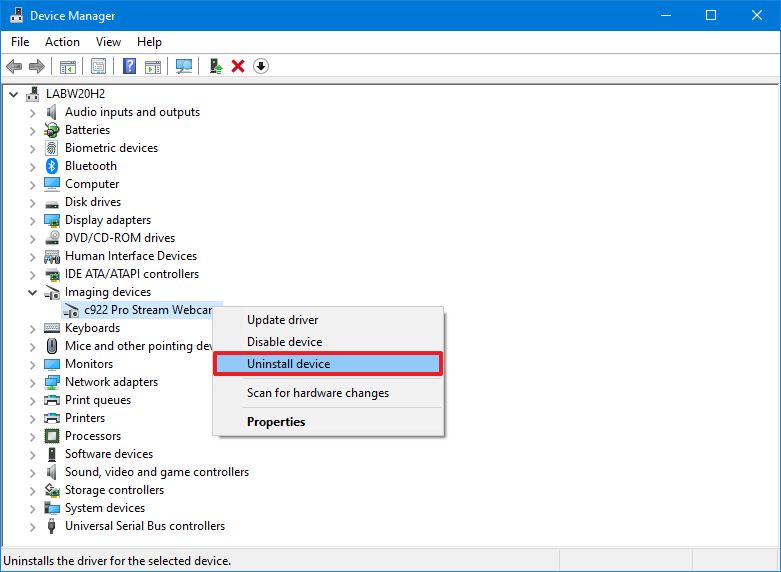
How to reinstall camera driver using Device Manager
When the camera stops working on Windows 10 because of a damaged driver or problem with the configuration, you can use Device Manager to reinstall the peripheral to resolve the issue.
To uninstall and reinstall the camera driver on Windows 10, use these steps:
- Open Start.
- Search for Device Manager, and click the top result to open the app.
- Expand the Imaging devices, Cameras or the Sound, video, and game controllers branch.
-
Right-click the webcam and select the Uninstall driver option.
 Source: Windows Central
 -
Click the Uninstall button.
 Source: Windows Central
 Quick tip: You can also check the Delete the driver software for this device option to force the system to re-download the driver from Windows Update. However, if the driver is not listed on Windows Update, you will have to download it manually from the manufacturer support website.
- Click the Actions menu.
-
Click the Scan for hardware changes option.
Source: Windows Central


Once you complete the steps, Windows 10 will reinstall the driver, and the camera should start working again.
How to fix apps camera access using antivirus
Some antivirus and other third-party security software come with privacy settings that can prevent apps from accessing the webcam. If you use a security solution that offers such features (such as the case of the Kaspersky Total Security), you need to dive into the privacy settings to allow apps access to the camera.
To configure the antivirus (for example, Kaspersky) to allow apps access to the camera on Windows 10, use these steps:
- Open Kaspersky.
-
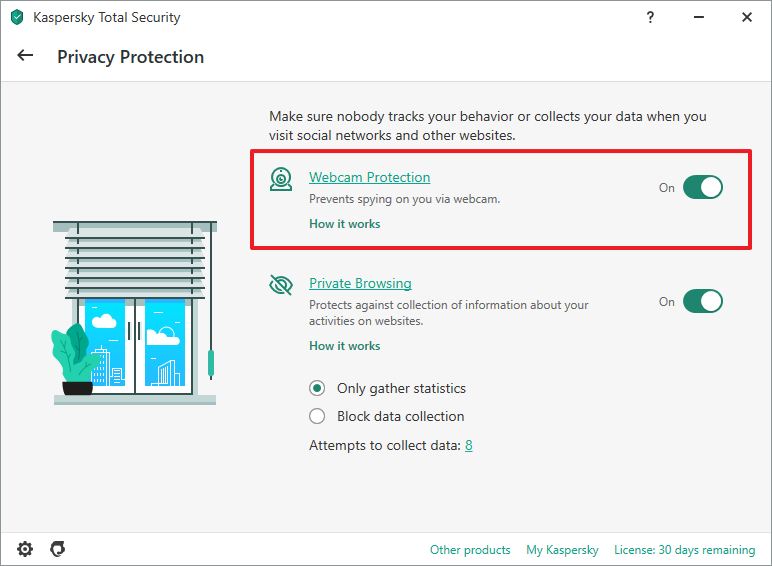
Click on Privacy Protection.
 Source: Windows Central
 -
Turn off the Webcam Protection toggle switch.
 Source: Windows Central
 - Click the Yes button to confirm.


After you complete the steps, the antivirus will no longer interfere, and you should now be able to use the camera with any app on Windows 10.
If you use a different antivirus, and you suspect it is blocking access to the camera, you may need to check the manufacturer support website for specific details to change the settings to fix the issue.
More Windows 10 resources
For more helpful articles, coverage, and answers to common questions about Windows 10, visit the following resources:
- Windows 10 on Windows Central – All you need to know
- Windows 10 help, tips, and tricks
- Windows 10 forums on Windows Central
We may earn a commission for purchases using our links. Learn more.
How to Connect a Camera to Windows 10
Source: https://www.windowscentral.com/how-fix-common-camera-problems-windows-10